
Oh, the glory of updating an unfinished basement! As much as I would love to be able to finish this basement off, it just doesn’t make sense to do so. The basement ceilings are 6 feet tall at the tallest point, and as low as 5’6” in other areas. Finishing off the ceiling and/or adding new floors would obviously lose that space, and would likely make it feel even smaller.
Plus, let’s be honest, it’s a utility-style unfinished basement. But that doesn’t mean it can’t be better!
Why I need to address the basement

Before I got into DIY, the only reason I would go down to the basement was to do laundry and when I needed to get something from storage. I absolutely hated my unfinished basement and avoided it at all costs!
However, I now regularly use my basement because it is the best place for me to work on my projects pretty much from October-May. When possible, I do like to work on projects in my backyard, but that is contingent on warm, dry weather, which only shows its face here a few months of the year. Remember, I live in Buffalo 😆.
But, it got to the point, that every time I was down there, I would just get very irritated. Not only was the organization an absolute nightmare, but it was impossible to keep clean. Between sawdust and cat litter dust, it would get on everything. The only real spot I had to set up my workbench was near the middle of the room, so it would obviously spread dust everywhere.
Well, I got to a point where I knew something needed to be done, so I made a plan. This unfinished basement project is probably going to take me somewhere around 3 months to complete (remember I work full-time), and I’m hoping around $1500, maybe $2000.

The Dreaded Unfinished Basement Floors


While I do appreciate that my unfinished basement floors are coated, vs bare concrete or even dirt, they aren’t sealed, and there are a lot of imperfections in the finish. Plus, it’s red. When we first moved into this house, there was A LOT of red and green. This included all of the bedrooms, the bathroom, even the exterior, and of course, the basement floor. Unfortunately, red and green is just not my thing.
This is going to be the first thing I tackle. I debated for quite a while on what I wanted to do here. Did I want to lay down a rubber floor, as you’d see in a gym? What about those faux-wood-looking foam squares? My main goal was something that would be easy to clean and durable. Eventually, I decided to go with an epoxy floor. I know that this will be a bit of work, and could be a bit risky if it doesn’t go well, but I do think it’s the best option!

I’m going with the Rustoleum Epoxyshield in Light Gray, and I’ve done quite a bit of research into how to apply this product. I’m going to continue researching, and get a good plan in place! Unfortunately, because we don’t have anywhere to store everything in the basement, I will have to split the floors up into two sections, which will take longer, but will hopefully be worth it!
Updating with Some Paint

There are four areas that I think need to be painted. First, the walls are just looking a bit dingy and could use a re-coat. They are currently painted with DryLok, which apparently you can paint over, so I’ll be doing that with a fresh white coat.

Second, I’d like to update the steel beam that runs the length of the basement. It’s rusted and dingy in a few places, so I think giving it a fresh coat of glossy black paint would really improve it and shouldn’t take long!

Next, two other red areas: the posts and the closet. The posts should also be really easy to paint, and I debated whether or not to cover them with wood trim to make them look nicer, but ultimately I decided to just paint them white. We’ll see when it’s painted how I feel. Lastly, we have this storage closet that spans the front of the basement. Right now, I’m thinking black could make it pop, and I have some leftover paint in Sherwin Williams Tricorn Black that could look great. Again, we’ll give it a try and see how it works when it’s done!
Fixing the Scary Stairs

Oh boy, these stairs are in rough shape. I’m fairly certain by the looks of it, that they likely aren’t up to any type of current code, but we’ll just keep that between us, right? I know that I want to add some risers because it not only looks better, but I find that a lot of cat litter falls underneath the stairs. I’m hoping that this solution will help make cleaning it up more manageable. PS: If anyone knows how to get old cats to stop tracking so much litter, that would be great, haha!
I also want to replace the treads. They have a lot of dents and wood grain that just trap dirt, so I’d like to get something smoother. Traditionally, you would just buy pre-built treads, but you know that’s not how I roll 😉! Instead, I plan on using some 2×10’s that I’ll sand down, route the edges to make them round, and then put down a few layers of poly to smooth them out. This will be a little bit more work, but will save me a little bit of money in the end!
Lastly, I’d like to update the railing. The current one is pretty janky and feels like it could fall off at any given moment! I plan on DIY’ing a modern railing, and also adding posts with some 4×4’s at the top and bottom to make it more sturdy.
Adding Some Much Needed Storage

Oh, this is a really big need and honestly part of what gives me such anxiety and irritation about my unfinished basement. I plan to designate one of the back corners just to storage and will build shelving units to help organize everything. I’m thinking some kind of U-shape shelving unit would be best, but I’ll probably start by building the shelves that will go on the back wall first. Once I build those and get things organized, I think I’ll have a clearer picture of what else I need.

I also want to section this area off from the rest of the basement to help with my dust containment issue. I’m thinking I’ll hang some kind of curtain on the side and front. I’m debating between using a drop cloth or actually getting a cheap curtain to hang. I think a drop cloth would make more sense as far as keeping it clean, but a semi-sheer curtain could help to let in light. There is a window in that corner, and the idea of completely covering that does worry me a bit. Maybe I’ll try both and see what works best!
My Own Workshop
This is probably the area that I’m most excited about! Ideally, I’d have a 2.5 car garage with a designated workshop, but I live in the city, and homes like mine just don’t have that! So, instead of wishing I had something I didn’t, I’m working with what I have and building a great workshop that I’ll love!

I already have a rolling workbench, but I’d like to also add one more so that I have basically an L-shaped bench. I’d like this new bench to have some great tool storage options as well. I’m hoping to be able to have the type of workshop where everything has its place!


I also desperately need some scrap wood storage. While I love those racks that you install directly to the wall and lay wood across, that isn’t entirely realistic with my unfinished basement walls. So, instead, I’m going to build a rolling cart for storage. There are several build plans out there, and while none of them are exactly what I’m looking for, I can use these to come up with a perfect hybrid option.
I also want to add some pegboards for smaller things like screwdrivers, etc. There are some gorgeous heavy-duty pegboards that are made for hand tools, but again, since my basement walls aren’t quite trustworthy in that arena, I’m going with the lighter version!

I have really 3 main goals for this area. To be efficient, have a sustainable organization system, and be somewhere I enjoy spending a few hours on weekends! I haven’t decided yet if I’m going to make my workshop “pretty” or not, but we’ll see when we get there! I feel like you can guess which way I’m leaning though 😉.
Other Details
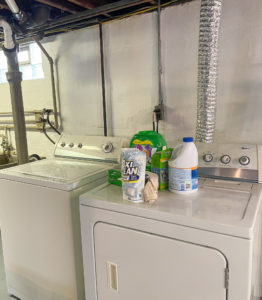
First, the laundry area. Right now, we keep all of our laundry supplies on top of the dryer, which is honestly fine, but it does mean that it can get a little dingy. I know that I can add a cute shelf behind the washer and dryer for pretty affordable, and while not a necessary update, it will be a nice update😊. Would I love to have a Pinterest-worthy laundry room? Of course, but I’ll make it work with what I have!

We also have this old, really scary metal sink. It desperately needs a really good cleaning first, then I’d like to build some kind of rolling storage that fits underneath. The goal would be to make it look like a cabinet, but not actually be a cabinet. Really, I just don’t want to have to look at it anymore because it kind of creeps me out haha!


Since most of my tools are in the closet now, this will give me a new opportunity to organize the closet once they are all moved to my workshop. I’m not entirely sure what I’ll use it for, and it’s quite dingy, so we’ll see how that goes.
Lastly, I want to build some sort of contraption around my cats’ litter box. I’m thinking some kind of box made of 2×4’s (kind of like a sandbox?) that goes around their cat litter mat. I’m hoping that this would at least keep the litter inside of this box, instead of spreading out everywhere like it currently does. Will this work? Honestly, I’m not sure, but I figure I’ll try, right!?
The Unfinished Basement Design

While this isn’t necessarily a pretty makeover, like a kitchen or bathroom, I still wanted to use a design board to get a sense of what I was doing. The epoxy that I decided to use is a light grey with flecks of white, blue, and black, so I decided to use this color scheme throughout! I think going with something light and neutral will really brighten the space up and make it a bit more inviting, and less grungy! Plus, you know I can’t turn down the chance to use blues!
The Timeline & Budget
I always create timelines, not because I want to feel pressured to keep to them (although sometimes I do!), but because it keeps me on track and from feeling overwhelmed! I like to have a goal in mind of when I’m going to finish a project, otherwise, it can feel like it’s taking forever! So, here’s the plan:
- Epoxy Flooring: 3 weeks
- Painting: 1 week
- Stairs: 2 weeks
- Storage: 2 weeks
- Workshop: 3 weeks
- Other details: 2 week
I think realistically, I’m looking at between $1500-$2000 for this unfinished basement. I know the floors are going to cost somewhere between $500-750, which will probably be the biggest expense. After that, I’m looking mostly at wood, which unfortunately doesn’t seem to be getting any cheaper. This is the rough goal, which can obviously change and move around as needed:
- Epoxy Flooring: $750
- Painting: $100
- Stairs: $150
- Storage: $250
- Workshop: $350
- Other details: $150
Well, I definitely have my work cut out for me! What part of the unfinished basement makeover are you most excited to see?