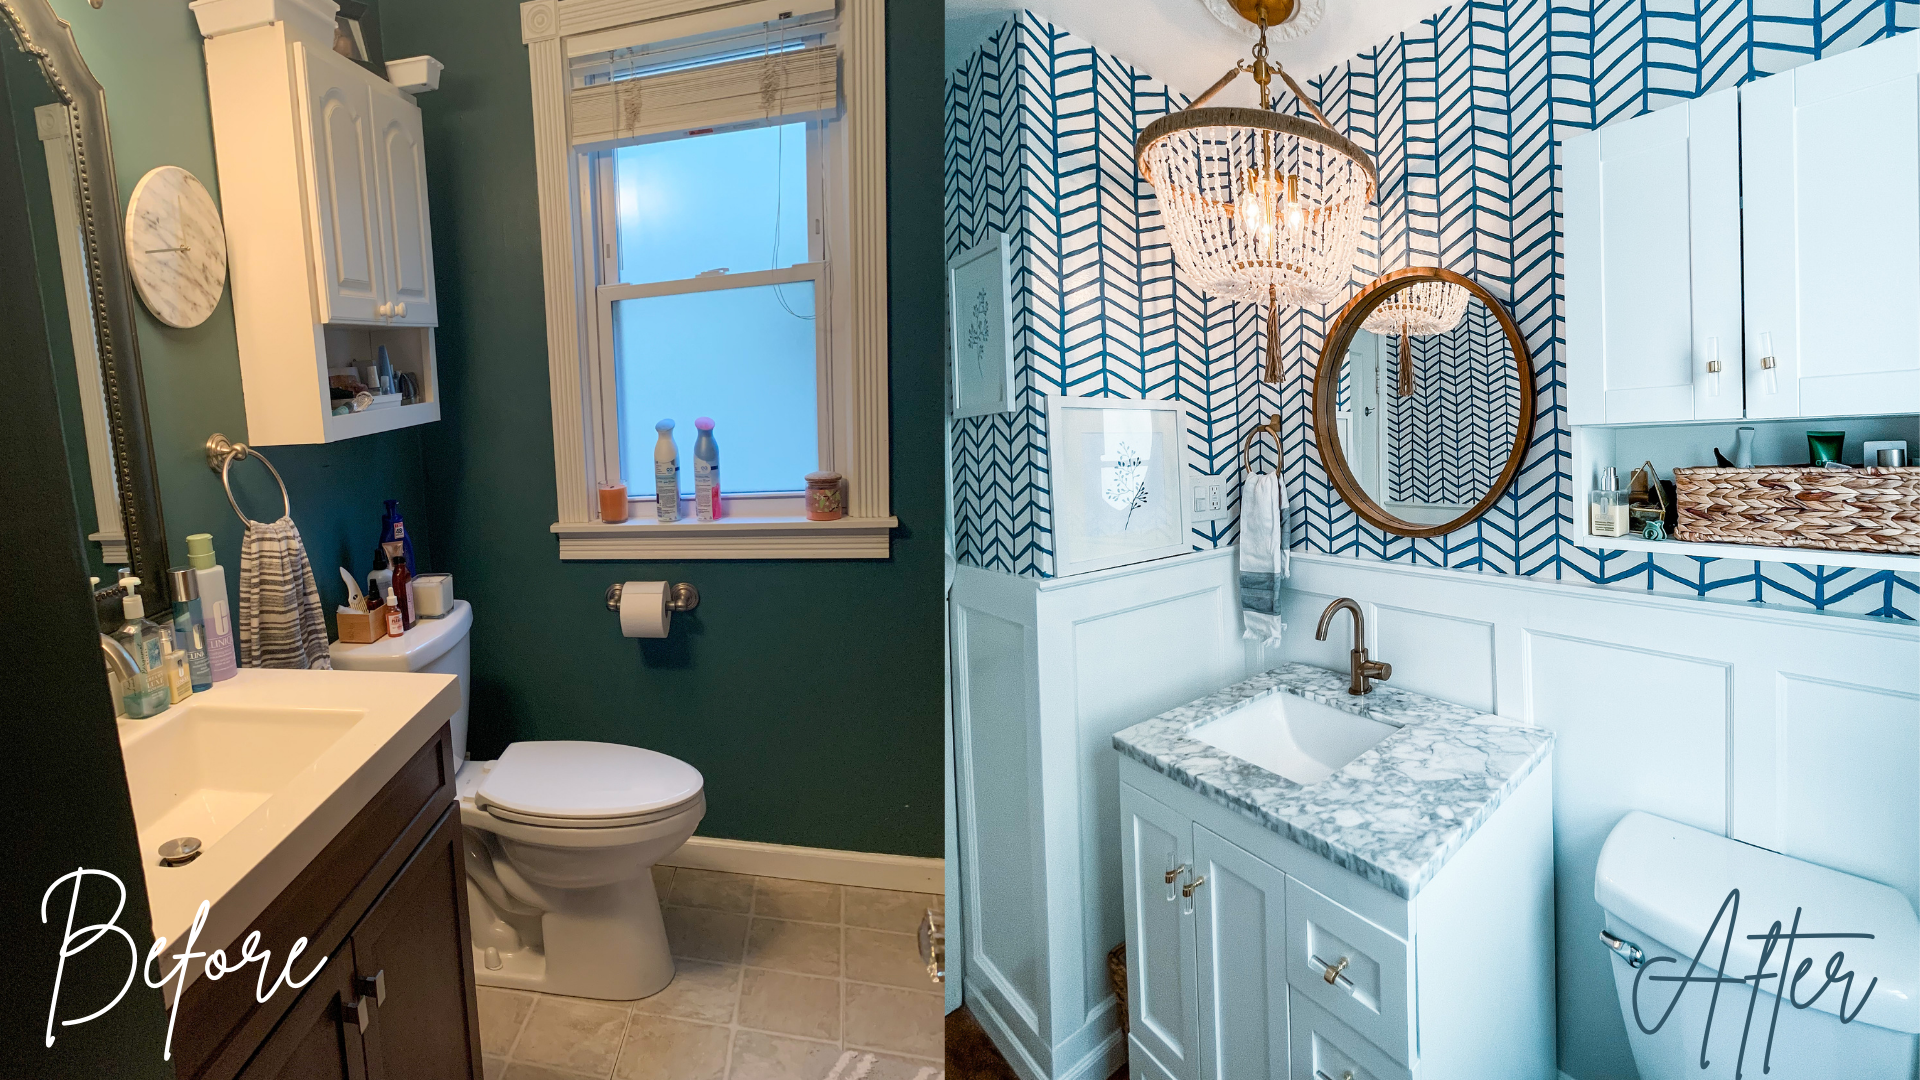
I know, what a difference, right?! I really packed a lot into this small space, but also gained so much from this DIY Coastal Bathroom project! Not only did I continue to build my skill set, but I learned more about my design style, and fell even more in love with DIY!
DIY Coastal Bathroom Recap:
- Designing my Bathroom
- DIY Serena and Lily Wallpaper for $9
- Installing Board and Batten in the Bathroom
- DIY Bathroom Flooring using Cali Bamboo
The Fixtures
So, this is where the power of design boards really came together. I wanted everything to happen pretty quickly, so I ordered everything in basically one sitting. To make decisions, I used Canva, and just played around with different options until I came up with my final design.

Vanity

My wishlist:
- 19″ deep
- Lots of drawers
- Countertop space
- Feet instead of solid bottom
This was incredibly difficult to search for! I was very limited by space, both the width and the depth. Most vanities are around 22” deep, but I needed one closer to 19”, which is pretty rare! I also really wanted a lot of storage options, including drawers since storage is always a struggle in a small home. Some extra space on the countertop was also on my must-have list. I get ready in the bathroom, so having extra counter space can be really helpful. The last thing I wanted was a vanity that had feet, instead of being solid on the bottom. Since our cat drinks from the sink, he sometimes splashes water behind it and I preferred to have the bottom open so that water didn’t get trapped down there.
There was only one that I could find that met all of my requirements but it was over my $500 budget. It was $850. Ugh. I kept searching and searching and never found anything similar, so I did end up purchasing it. I’m still very happy with the design of the vanity, but I do have to say that the quality is a little subpar for such a pricey vanity. The marble top is still gorgeous and I do clean it nightly with a marble cleaner. But, the drawer and door fronts have a couple of little dings and marks in them. The inside of the drawers have held up beautifully, but I think the doors/drawer fronts are made of MDF, and it definitely shows.
Honestly, if I were faced with this situation again, I’d probably try to build my own, but overall, I don’t regret the purchase.
Note: I see that the price went WAY up. Unless they changed the materials of the doors and drawer fronts, I definitely think this is overpriced.
Faucet

My wishlist:
- A pretty champagne gold
- Single-hole
- No deck plate (or one that would remove)
We went through three faucets here. Haha. My poor husband. Our original faucet was this beautiful Delta one. Unfortunately, there was a clog in one of the lines and we couldn’t get it to work. We weren’t sure what the cause was, so I ended up ordering another option off Wayfair. Turns out, this was one was for Canadian sinks. I didn’t realize that US and Canadian sinks were built so differently, but it didn’t fit. We tried the Delta faucet again but couldn’t get the clog out, so I made a trip to Lowe’s and found this very similar, but more affordable option and it installed perfectly. We’ve been pretty happy with it, although it is difficult to keep clean.
Hardware

My wishlist:
- Gold tones
- Knob style
- Transitional style
The hardware that came with the vanity wasn’t the look I was going for, so I ended up ordering these beautiful ones off Etsy. They were pretty easy to install, and they’re gorgeous. However, after a year and a half, I have noticed that the gold is starting to tarnish a bit. It’s not super noticeable yet, but I will likely have to replace them at some point.
Light Fixture

My wishlist:
- Statement piece
- Coastal-inspired
This was another piece that I fell in love with! However, when it came we both gasped at how much bigger it is than I had thought. Lol, it’s really large and in charge, but I actually do still really like it. I think because of the placement of the vanity and mirror, it does work, although a smaller one may be better.
Mirror

My wishlist:
- Wood toned
Because of the size of the light fixture, having a smaller mirror does probably help a bit. I toyed around with the idea of using this mirror instead for a while, but I think the roundness of this one adds a bit more.
Wall cabinet

Honestly, my only requirement here was that the style of the doors matched the style of the vanity, which is shaker. I didn’t really want the bottom shelf, because it’s an area that collects dust, but honestly, it’s proved to be quite useful! I also added the same hardware to this so that it matches the vanity.
Laundry Shoot Cover


I love our little laundry shoot in the bathroom. It’s so dang useful! But, I wasn’t a huge fan of the cover. It was painted metal, and there were some old stains on it that wouldn’t come out. I decided to remove it and make a new cover. When I removed the old cover, I discovered that the walls were a very crumbly plaster, which made this a bit more difficult than I was anticipating. I covered these up with some pieces of plywood to make it smoother and keep the wall from continuing to crumble!
Then, I picked up these affordable frames from Michaels and found some prints off Etsy. I screwed in some hinges to the frame, then also the wall. This is definitely a two-person job since you need one person to hold the frame steady for you while you screw. I added a matching frame and photo to the other wall.
Accessories
The toilet paper and towel holder are a set from West Elm, which is also where I picked up a similar set of shower rings. The shower curtain, rug and garbage can are all from Target.
The Timeline

I re-did this bathroom in 16 days. I still can’t believe that, but it was pretty necessary. We only have one bathroom in the house, so it needed to get taken care of pretty quickly.
- Day 1: Finalize design
- Day 2: Ordering
- Days 3-9: Prep work: Window trim, wainscoting (measuring, pre-cuts, and wood prep). remove and patch behind the medicine cabinet
- Days 10-13: Faux wallpaper
- Day 14: Demo: Vanity (including fixing and painting a wall), baseboards
- Days 14-15: Install: Flooring, wainscoting, vanity/faucet, light, wall cabinet, mirror, hardware
- Day 16: Accessorize and Decorate
Then, I waited a year before re-doing the trim, which I did take my time doing and took me about two weeks from demo to paint. Still, not bad.
The Budget
I will always be transparent about this part because cost is one of the biggest reasons I got into DIY! So, let’s break it down:
- Paint and Paint Supplies: $73
- Trim Materials and Supplies: $285
- Flooring and Supplies: $325
- Fixtures (Vanity, Light, Cabinet, Faucet): $1242
- Accessories (Hardware, Mirror, Curtain, Rug, Garbage): $325
TOTAL: $2250
Final Thoughts on my DIY Coastal Bathroom
Seriously, I still love looking at the before and after photos of this project. It just astounds me how much a small space can be impacted in a project that took me a couple of weeks and only $2250. I’m so glad I decided to go bolder with it. It really gave me confidence in my style and excited to see what else I could accomplish.